UnityShader-基础纹理

UnityShader-基础纹理

纹理映射(texture mapping):使用一张图片来控制模型外观

纹理映射坐标(texture-mapping):定义了该顶点在纹理中对应的2D坐标,通常使用二维变量(u, v)表示,也被称为UV坐标,范围被归一化到[0, 1]

纹理采样时使用的纹理坐标不一定在[0, 1]范围内,会根据平铺模式决定如何采样

在Unity中,纹理空间符合OpenGL传统,原点位于纹理左下角

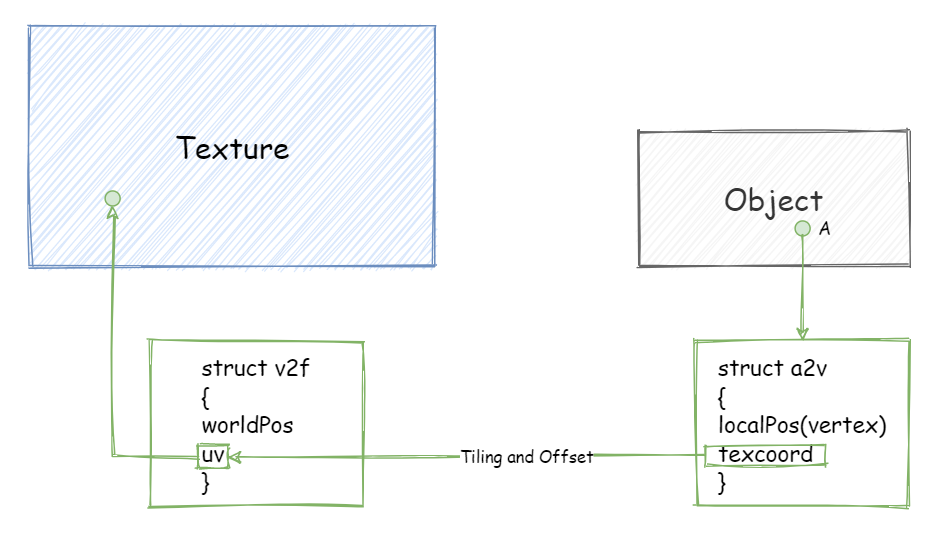
纹理的处理过程可以用以下图片内容描述:

image-20210823153409761

  • 在应用阶段,物体上每个顶点的纹理坐标就已经被计算出来,并伴随顶点位置信息一齐传递给几何阶段

  • 在几何阶段,纹理坐标会经过平铺和位移变换,生成所谓的UV坐标,这时利用UV坐标可以计算出该顶点采样的像素值,算法类似于插值:

    1
    2
    3
    4
    5
    6
    7
    8
    struct PIXEL GetTargetPixelWithUV()
    {
    struct PIXEL pixels[HORIZONTAL_AMOUNT_OF_PIXELS][VERTICAL_AMOUNT_OF_PIXELS];
    int row = Lerp(0, HORIZONTAL_AMOUNT_OF_PIXELS, uv.x);
    int col = Lerp(0, VERTICAL_AMOUNT_OF_PIXELS, uv.y);
    struct PIXEL target = pixels[row][col];
    return target;
    }

单张纹理

Shader实现:

1
2
3
4
5
6
7
8
9
10
11
12
13
14
15
16
17
18
19
20
21
22
23
24
25
26
27
28
29
30
31
32
33
34
35
36
37
38
39
40
41
42
43
44
45
46
47
48
49
50
51
52
53
54
55
56
57
58
59
60
61
62
63
64
65
66
67
68
69
70
71
72
73
74
75
76
77
78
79
80
81
82
83
84
// Upgrade NOTE: replaced '_Object2World' with 'unity_ObjectToWorld'

Shader "AABB/Single Texture" {
Properties {
_Color ("Color Tint", Color) = (1, 1, 1, 1)
_MainTex ("Main Tex", 2D) = "white" {}
_Specular ("Specular", Color) = (1, 1, 1, 1)
_Gloss ("Gloss", Range(8.0, 256)) = 20
}
SubShader {
Pass {
Tags { "LightMode" = "ForwardBase" }

CGPROGRAM

#include "UnityCG.cginc"
#include "Lighting.cginc"
#pragma vertex vert
#pragma fragment frag

fixed4 _Color;
sampler2D _MainTex;
// 声明纹理的某个属性:纹理名_ST, S: scale T: translation
// _MainTex_ST.xy 存储缩放值, .zw存放偏移值
float4 _MainTex_ST;
fixed4 _Specular;
float _Gloss;

struct a2v {
float4 vertex : POSITION;
float3 normal : NORMAL;
float4 texcoord : TEXCOORD0;
};

struct v2f {
float4 pos : SV_POSITION;
float3 worldNormal : TEXCOORD0;
float3 worldPos : TEXCOORD1;
float2 uv : TEXCOORD2;
};

v2f vert(a2v v) {
v2f o;
o.pos = UnityObjectToClipPos(v.vertex);
o.worldNormal = UnityObjectToWorldNormal(v.normal);
o.worldPos = mul(unity_ObjectToWorld, v.vertex).xyz;

//o.uv = v.texcoord.xy * _MainTex_ST.xy + _MainTex_ST.zw;
// built-in function
o.uv = TRANSFORM_TEX(v.texcoord, _MainTex);

return o;
}

fixed4 frag(v2f i): SV_Target {
fixed3 worldNormal = normalize(i.worldNormal);
fixed3 worldLightDir = normalize(UnityWorldSpaceLightDir(i.worldPos));

// 使用CG的tex2D函数进行采样,第一个参数是需要采样的纹理。第二个参数是纹理坐标,返回计算得到的纹素(纹理像素)值
// 使用采样结果和_Color的乘积作为材质的反射率
fixed3 albedo = tex2D(_MainTex, i.uv).rgb * _Color.rgb;

fixed3 ambient = UNITY_LIGHTMODEL_AMBIENT.xyz * albedo;

fixed3 diffuse = _LightColor0.rgb * albedo * saturate(dot(worldNormal, worldLightDir));

// fixed3 viewDir = normalize(_WorldSpaceCameraPos.xyz - i.worldPos.xyz);
// 输入为世界空间中的顶点位置
fixed3 viewDir = normalize(UnityWorldSpaceViewDir(i.worldPos));

// Vec_h = (Vec3_view + Vec3_light) / (length(Vec3_view + Vec3_light))
fixed3 halfDir = normalize(worldLightDir + viewDir);

// C_specular = (C_light * m_specular) * (max(0, dot(Vec3_normal * Vec3_h)))**m_gloss
fixed3 specular = _LightColor0.rgb * _Specular.rgb * pow(max(0, dot(worldNormal, halfDir)), _Gloss);

return fixed4(ambient + diffuse + specular, 1.0);
}
ENDCG
}
}

Fallback "Specular"
}

纹理的属性设置:

texture_properties.png-29kB

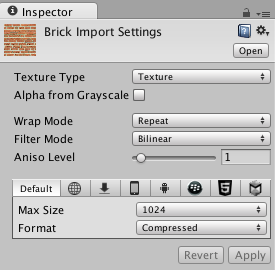
  • Alpha from Grayscale:勾选后,透明通道的值将会由每个像素的灰度值生成
  • Wrap Mode:决定纹理坐标超过[0, 1]后将会如何被平铺。有两种模式:
    • Repeat:如果纹理坐标超过1,则整数部分被舍弃,直接使用小数部分进行采样,结果是纹理不断重复
    • Clamp:如果纹理大于1,则被截取到1,如果小于0,则被截取到0
  • Filter Mode:决定纹理由于变换而产生拉伸时将会采用哪种滤波模式。支持3种模式:Point, Bilinear, Trilinear。得到的图片滤波效果依次提升,但是耗费的性能也会增加
    • Point:使用最近邻(nearest neighbor)滤波,在放大或者缩小时,采样像素数目只有一个
    • Bilinear:线性滤波,会找到4个邻近像素进行插值混合,通常选择该模式
    • Trilinear:会在多级渐远纹理之间进行混合,单张纹理下和Bilinear效果相同

多级渐进纹理(mipmapping):将原纹理提前用滤波处理来得到很多更小的图像,得到多层较小纹理,当物体远离摄像机时,直接使用较小纹理进行计算。在Unity中通过勾选Generate Mip Maps来实现

注:这里我的理解是,假设原来拥有128x128大小的纹理和平面,两者刚好贴合,当平面因为远离摄像机而面积变小后(经过了透视除法,x, y,z的坐标值被除以w),经过屏幕映射而包围的像素数目减少,假设为64x64像素大小,此时采集128x128大小的纹理时,中间会间隔一个像素无法被采集到,因此容易出现马赛克或者锯齿,丢失细节(在LearnOpenGL中说还会导致内存浪费,我暂时不能理解),因此我们可以提前将纹理以合适的方式处理好(而不一定是默认插值方式),并生成对应的小纹理,这样采样时就能够控制细节。

纹理最大尺寸(Max Size):如果导入纹理超过设置的最大尺寸,则会将纹理缩放为该最大分辨率。导入纹理大小最好时2的幂,有利于存储

纹理模式(Format):影响纹理的精度和占用内存

凹凸映射(bump mapping)

目的:使用一张纹理来修改模型表面的法线,以提供更多的细节,让模型看起来凹凸不平

主要实现方法分为高度纹理(height map)和法线纹理(normal map)

高度纹理

高度纹理使用一张高度图来实现凹凸映射,高度图中存储强度值,用于表示模型表面局部的海拔高度

缺点:计算复杂,不能直接得到表面法线,需要由灰度值计算获得

法线纹理

存储表面的法线方向,法线和像素之间的映射关系为:
$$
pixel = \frac{normal + 1}{2}
$$
法线纹理按照坐标系的不同分为**模型空间下的法线纹理(object-space normal map)切线空间下的法线纹理(tangent-space normal map)**。一般选择后者,因为切线空间下的法线纹理记录的是相对法线信息,能够适应完全不同的网格。

切线空间:

原点为顶点,z轴是顶点的法线方向,x轴是切线方向,y轴是副切线方向

在切线空间下计算:

1
2
3
4
5
6
7
8
9
10
11
12
13
14
15
16
17
18
19
20
21
22
23
24
25
26
27
28
29
30
31
32
33
34
35
36
37
38
39
40
41
42
43
44
45
46
47
48
49
50
51
52
53
54
55
56
57
58
59
60
61
62
63
64
65
66
67
68
69
70
71
72
73
74
75
76
77
78
79
80
81
82
83
84
85
86
87
88
89
90
91
92
93
94
95
96
97
98
99
100
101
102
103
104
105
106
107
108
109
110
Shader "Normal Map In Tangent Space" {
Properties {
_Color("Color Tint", Color) = (1, 1, 1, 1)
_MainTex("Main Tex", 2D) = "white" {}
// bump: Unity内置的法线纹理,当没有提供任何法线纹理时。"bump"对应模型自带的法线信息
_BumpMap("Normal Map", 2D) = "bump" {}
// 控制凹凸程度,为0时。法线纹理不会对光照产生任何影响
_BumpScale("Bump Scale", Float) = 1.0
_Specular("Specular", Color) = (1, 1, 1, 1)
_Gloss("Gloss", Range(8.0, 256)) = 20.0
}

SubShader {
Pass {
Tags { "LightMode" = "ForwardBase" }

CGPROGRAM
#include "Lighting.cginc"
#pragma vertex vert
#pragma fragment frag

fixed4 _Color;
sampler2D _MainTex;
float4 _MainTex_ST;
sampler2D _BumpMap;
float4 _BumpMap_ST;
float _BumpScale;
fixed4 _Specular;
float _Gloss;

struct a2v {
float4 vertex : POSITION;
float3 normal : NORMAL;
// tangent的xyz分量存放切线向量,而w分量决定副切线的方向性
float4 tangent : TANGENT;
float4 texcoord : TEXCOORD0;
};

struct v2f {
float4 pos : SV_POSITION;
float4 uv : TEXCOORD0;
float3 lightDir : TEXCOORD1;
float3 viewDir : TEXCOORD2;
};

v2f vert(a2v v) {
v2f o;
o.pos = UnityObjectToClipPos(v.vertex);
// 存储纹理坐标
o.uv.xy = v.texcoord.xy * _MainTex_ST.xy + _MainTex_ST.zw;
// 存储法线纹理坐标
o.uv.zw = v.texcoord.xy * _BumpMap_ST.xy + _BumpMap_ST.zw;

// float3 binormal = cross(normalize(v.normal), normalize(v.tangent.xyz)) * v.tangent.w;
// Construct a matrix which transform vectors from object space to tangent space
// float3x3 rotation = float3x3(v.tangent.xyz, binormal, v.normal);
// Or just use the built-in macro
TANGENT_SPACE_ROTATION;

// Transform the light direction from object space to tangent space
o.lightDir = mul(rotation, ObjSpaceLightDir(v.vertex)).xyz;
// Transform the view direction from object space to tangent space
o.viewDir = mul(rotation, ObjSpaceViewDir(v.vertex)).xyz;

return o;
}

fixed4 frag(v2f i): SV_Target {
fixed3 tangentLightDir = normalize(i.lightDir);
fixed3 tangentViewDir = normalize(i.viewDir);

// Get the texel in the normal map
fixed4 packedNormal = tex2D(_BumpMap, i.uv.zw);
fixed3 tangentNormal;

// If the texture is not marked as "Normal map"
// tangentNormal.xy = (packedNormal.xy * 2 - 1) * _BumpScale;
// tangentNormal.z = sqrt(1.0 - saturate(dot(tangentNormal.xy, tangentNormal.xy)));

// Or mark the texture as "Normal map", and use the built-in function
// Unity会根据不同平台选择压缩算法,因此使用内置函数获得切线向量会更加安全
tangentNormal = UnpackNormal(packedNormal);
tangentNormal.xy *= _BumpScale;
// 当_BumpScale越大时,xy的值也就越大,计算出的z值越小,凹凸程度越大
// 注意到,当tangentNormal.xy为0时,法线方向就为(0, 0, 1),即默认的法线方向,没有用到凹凸纹理
tangentNormal.z = sqrt(1.0 - saturate(dot(tangentNormal.xy, tangentNormal.xy)));

// 使用CG的tex2D函数进行采样,第一个参数是需要采样的纹理。第二个参数是纹理坐标,返回计算得到的纹素(纹理像素)值
// 此过程类似于映射,即该片段对应的uv的值被映射到纹理图片的某个像素上,然后对该像素进行采样作为需求的颜色值
// 使用采样结果和_Color的乘积作为材质的反射率
fixed3 albedo = tex2D(_MainTex, i.uv).rgb * _Color.rgb;

fixed3 ambient = UNITY_LIGHTMODEL_AMBIENT.xyz * albedo;

fixed3 diffuse = _LightColor0.rgb * albedo * saturate(dot(tangentNormal, tangentLightDir));

// Vec_h = (Vec3_view + Vec3_light) / (length(Vec3_view + Vec3_light))
fixed3 halfDir = normalize(tangentLightDir + tangentViewDir);

// C_specular = (C_light * m_specular) * (max(0, dot(Vec3_normal * Vec3_h)))**m_gloss
fixed3 specular = _LightColor0.rgb * _Specular.rgb * pow(max(0, dot(tangentNormal, halfDir)), _Gloss);

return fixed4(ambient + diffuse + specular, 1.0);
}
ENDCG

}
}
Fallback "Specular"
}

在世界空间下计算:

基本思想:在顶点着色器中计算从切线空间到世界空间的变换矩阵,并把它传递给片元着色器。变换矩阵的计算可以由切线空间的标准基在世界空间下的表示得到

1
2
3
4
5
6
7
8
9
10
11
12
13
14
15
16
17
18
19
20
21
22
23
24
25
26
27
28
29
30
31
32
33
34
35
36
37
38
39
40
41
42
43
44
45
46
47
48
49
50
51
52
53
54
55
56
57
58
59
60
61
62
63
64
65
66
67
68
69
70
71
72
73
74
75
76
77
78
79
80
81
82
83
84
85
86
87
88
89
90
91
92
93
94
95
96
97
98
99
100
Shader "Normal Map In World Space" {
Properties {
_Color("Color Tint", Color) = (1, 1, 1, 1)
_MainTex("Main Tex", 2D) = "white" {}
// bump: Unity内置的法线纹理,当没有提供任何法线纹理时。"bump"对应模型自带的法线信息
_BumpMap("Normal Map", 2D) = "bump" {}
// 控制凹凸程度,为0时。法线纹理不会对光照产生任何影响
_BumpScale("Bump Scale", Float) = 1.0
_Specular("Specular", Color) = (1, 1, 1, 1)
_Gloss("Gloss", Range(8.0, 256)) = 20.0
}

SubShader {
Pass {
Tags { "LightMode" = "ForwardBase" }

CGPROGRAM
#include "Lighting.cginc"
#pragma vertex vert
#pragma fragment frag

fixed4 _Color;
sampler2D _MainTex;
float4 _MainTex_ST;
sampler2D _BumpMap;
float4 _BumpMap_ST;
float _BumpScale;
fixed4 _Specular;
float _Gloss;

struct a2v {
float4 vertex : POSITION;
float3 normal : NORMAL;
float4 tangent : TANGENT;
float4 texcoord : TEXCOORD0;
};

struct v2f {
float4 pos : SV_POSITION;
float4 uv : TEXCOORD0;
// 目标:存储从切线空间到世界空间的变换矩阵,用于对法线贴图中的法线进行变换
// 该矩阵由切线空间的坐标轴组成,即x:切线,y:副切线,z:法线
float4 TtoW0 : TEXCOORD1;
float4 TtoW1 : TEXCOORD2;
float4 TtoW2 : TEXCOORD3;
};

v2f vert(a2v v) {
v2f o;
o.pos = UnityObjectToClipPos(v.vertex);
// 存储纹理坐标
o.uv.xy = v.texcoord.xy * _MainTex_ST.xy + _MainTex_ST.zw;
// 存储法线纹理坐标
o.uv.zw = v.texcoord.xy * _BumpMap_ST.xy + _BumpMap_ST.zw;

float3 worldPos = mul(unity_ObjectToWorld, v.vertex).xyz;
fixed3 worldNormal = UnityObjectToWorldNormal(v.normal);
fixed3 worldTangent = UnityObjectToWorldDir(v.tangent.xyz);
fixed3 worldBinormal = cross(worldNormal, worldTangent) * v.tangent.w;

// Compute the matrix that transform directions from tangent space to world space
// Put the world position in w component for optimization
o.TtoW0 = float4(worldTangent.x, worldBinormal.x, worldNormal.x, worldPos.x);
o.TtoW1 = float4(worldTangent.y, worldBinormal.y, worldNormal.y, worldPos.y);
o.TtoW2 = float4(worldTangent.z, worldBinormal.z, worldNormal.z, worldPos.z);

return o;
}

fixed4 frag(v2f i): SV_Target {
// Get the position in world space
float3 worldPos = float3(i.TtoW0.w, i.TtoW1.w, i.TtoW2.w);
// Compute the light and view dir in world space
fixed3 lightDir = normalize(UnityWorldSpaceLightDir(worldPos));
fixed3 viewDir = normalize(UnityWorldSpaceViewDir(worldPos));

// Get the normal in tangent space
fixed3 bump = UnpackNormal(tex2D(_BumpMap, i.uv.zw));
bump.xy *= _BumpScale;
bump.z = sqrt(1.0 - saturate(dot(bump.xy, bump.xy)));
// Transform the narmal from tangent space to world space
bump = normalize(half3(dot(i.TtoW0.xyz, bump), dot(i.TtoW1.xyz, bump), dot(i.TtoW2.xyz, bump)));

fixed3 albedo = tex2D(_MainTex, i.uv).rgb * _Color.rgb;

fixed3 ambient = UNITY_LIGHTMODEL_AMBIENT.xyz * albedo;

fixed3 diffuse = _LightColor0.rgb * albedo * max(0, dot(bump, lightDir));

fixed3 halfDir = normalize(lightDir + viewDir);
fixed3 specular = _LightColor0.rgb * _Specular.rgb * pow(max(0, dot(bump, halfDir)), _Gloss);

return fixed4(ambient + diffuse + specular, 1.0);
}
ENDCG

}
}
Fallback "Specular"
}

关于Unity对Normal map类型纹理的压缩问题:

Unity在某些平台上使用了DXT5nm的压缩格式,因此需要针对这种格式进行解码,在DXT5nm格式的法线纹理中,纹素的a通道对应法线的x分量,g通道对应法线的y分量,r和b通道被舍弃,法线的z分量由xy推导而得,这样可以减少法线纹理占用的内存空间

Create from Grayscale:用于从高度图中生成法线纹理,设置后可以调整Bumpiness和Filtering来控制凹凸程度和计算方式

渐变纹理(ramp texture)

可以用于控制漫反射光照效果,生成类似于卡通风格的图像

实现代码:

1
2
3
4
5
6
7
8
9
10
11
12
13
14
15
16
17
18
19
20
21
22
23
24
25
26
27
28
29
30
31
32
33
34
35
36
37
38
39
40
41
42
43
44
45
46
47
48
49
50
51
52
53
54
55
56
57
58
59
60
61
62
63
64
65
66
67
68
69
70
71
72
73
74
75
76
77
78
79
80
81
Shader "Ramp Texture" {
Properties {
_Color("Color Tint", Color) = (1, 1, 1, 1)
_RampTex("Ramp Tex", 2D) = "white" {}
_Specular("Specular", Color) = (1, 1, 1, 1)
_Gloss("Gloss", Range(8.0, 256)) = 20
}

SubShader {
Pass {
Tags { "LightMode" = "ForwardBase" }

CGPROGRAM

#include "Lighting.cginc"
#pragma vertex vert
#pragma fragment frag

fixed4 _Color;
sampler2D _RampTex;
float4 _RampTex_ST;
fixed4 _Specular;
float _Gloss;

struct a2v {
float4 vertex : POSITION;
float3 normal : NORMAL;
float4 texcoord : TEXCOORD0;
};

struct v2f {
float4 pos : SV_POSITION;
float3 worldNormal : TEXCOORD0;
float3 worldPos: TEXCOORD1;
float2 uv : TEXCOORD2;
};

v2f vert(a2v v)
{
v2f o;

o.pos = UnityObjectToClipPos(v.vertex);

o.worldNormal = UnityObjectToWorldNormal(v.normal);

o.worldPos = mul(unity_ObjectToWorld, v.vertex).xyz;

o.uv = TRANSFORM_TEX(v.texcoord, _RampTex);

return o;
}

fixed4 frag(v2f i) : SV_Target {
fixed3 worldNormal = normalize(i.worldNormal);
fixed3 worldLightDir = normalize(UnityWorldSpaceLightDir(i.worldPos));

fixed3 ambient = UNITY_LIGHTMODEL_AMBIENT.xyz;

// Use the texture to sample the diffuse color
fixed halfLambert = 0.5 * dot(worldNormal, worldLightDir) + 0.5;

// 将该片段的halfLambert(0~1)对应的值映射到纹理图片上,获得一个像素值
// 由于_RampTex为一维纹理,颜色从左到右分段加深,因此漫反射弱(halfLambert小)的地方采样颜色深,
// 漫反射强(halfLambert大)的地方采样颜色浅,因此形成视觉上的渐变纹理
fixed3 diffuseColor = tex2D(_RampTex, fixed2(halfLambert, halfLambert)).rgb * _Color.rgb;

fixed3 diffuse = _LightColor0.rgb * diffuseColor;

fixed3 viewDir = normalize(UnityWorldSpaceViewDir(i.worldPos));

fixed3 halfDir = normalize(worldLightDir + viewDir);

fixed3 specular = _LightColor0.rgb * _Specular.rgb * pow(max(0, dot(worldNormal, halfDir)), _Gloss);

return fixed4(ambient + diffuse + specular, 1.0);
}
ENDCG
}
}
Fallback "Specular"
}

需要注意的是,我们需要把渐变纹理的Wrap Mode设置成Clamp模式,以防止对纹理进行采样时由于浮点数精度造成的问题

遮罩纹理(mask texture)

遮罩允许我们可以保护某些区域,使它们免于某些修改。

  • 用于控制某些区域的反光强度,得到更加细腻的效果
  • 控制多种纹理的混合

流程:通过采样得到遮罩纹理的纹素值,然后使用其中某个(或某几个)通道的值来于某种表面属性相乘,可以保证像素级别地控制模型表面的各种性质

实现代码:

1
2
3
4
5
6
7
8
9
10
11
12
13
14
15
16
17
18
19
20
21
22
23
24
25
26
27
28
29
30
31
32
33
34
35
36
37
38
39
40
41
42
43
44
45
46
47
48
49
50
51
52
53
54
55
56
57
58
59
60
61
62
63
64
65
66
67
68
69
70
71
72
73
74
75
76
77
78
79
80
81
82
83
84
85
86
87
88
89
90
91
92
93
94
95
Shader "Mask Texture" {
Properties {
_Color ("Color Tint", Color) = (1, 1, 1, 1)
_MainTex ("Main Tex", 2D) = "white" {}
_BumpMap ("Normal Map", 2D) = "bump" {}
_BumpScale("Bump Scale", Float) = 1.0
_SpecularMask ("Specular Mask", 2D) = "white" {}
_SpecularScale ("Specular Scale", Float) = 1.0
_Specular ("Specular", Color) = (1, 1, 1, 1)
_Gloss ("Gloss", Range(8.0, 256)) = 20
}
SubShader {
Pass {
Tags { "LightMode"="ForwardBase" }

CGPROGRAM

#pragma vertex vert
#pragma fragment frag

#include "Lighting.cginc"

fixed4 _Color;
sampler2D _MainTex;
// 三个纹理公用一个属性变量,此时修改平铺和偏移系数会同时影响3个纹理的采样
float4 _MainTex_ST;
sampler2D _BumpMap;
float _BumpScale;
sampler2D _SpecularMask;
float _SpecularScale;
fixed4 _Specular;
float _Gloss;

struct a2v {
float4 vertex : POSITION;
float3 normal : NORMAL;
float4 tangent : TANGENT;
float4 texcoord : TEXCOORD0;
};

struct v2f {
float4 pos : SV_POSITION;
float2 uv : TEXCOORD0;
float3 lightDir: TEXCOORD1;
float3 viewDir : TEXCOORD2;
};

v2f vert(a2v v) {
v2f o;
o.pos = UnityObjectToClipPos(v.vertex);

o.uv.xy = v.texcoord.xy * _MainTex_ST.xy + _MainTex_ST.zw;

// Construct a matrix: rotation,
// which transform vectors from object space to tangent space
TANGENT_SPACE_ROTATION;

o.lightDir = mul(rotation, ObjSpaceLightDir(v.vertex)).xyz;
o.viewDir = mul(rotation, ObjSpaceViewDir(v.vertex)).xyz;

return o;
}

fixed4 frag(v2f i) : SV_Target {
fixed3 tangentLightDir = normalize(i.lightDir);
fixed3 tangentViewDir = normalize(i.viewDir);

fixed3 tangentNormal = UnpackNormal(tex2D(_BumpMap, i.uv));

tangentNormal.xy *= _BumpScale;

tangentNormal.z = sqrt(1.0 - saturate(dot(tangentNormal.xy, tangentNormal.xy)));

fixed3 albedo = tex2D(_MainTex, i.uv).rgb * _Color.rgb;

fixed3 ambient = UNITY_LIGHTMODEL_AMBIENT * albedo;

fixed3 diffuse = _LightColor0.rgb * albedo * max(0, dot(tangentNormal, tangentLightDir));

fixed3 halfDir = normalize(tangentLightDir + tangentViewDir);

// Get the mask value
fixed specularMask = tex2D(_SpecularMask, i.uv).r * _SpecularScale;

// Compute specular term with the specular mask
fixed3 specular = _LightColor0.rgb * _Specular.rgb * pow(max(0, dot(tangentNormal, halfDir)), _Gloss) * specularMask;

return fixed4(ambient + diffuse + specular, 1.0);

}
ENDCG
}
}
FallBack "Specular"
}

UnityShader-基础纹理
http://example.com/2021/07/15/UnityShader-基础纹理/
作者
Chen Shuwen
发布于
2021年7月15日
许可协议