UnityShader-透明效果
Unity中通常使用2种方法来实现透明效果:透明度测试(Alpha Test)和透明度混合(Alpha Blending)
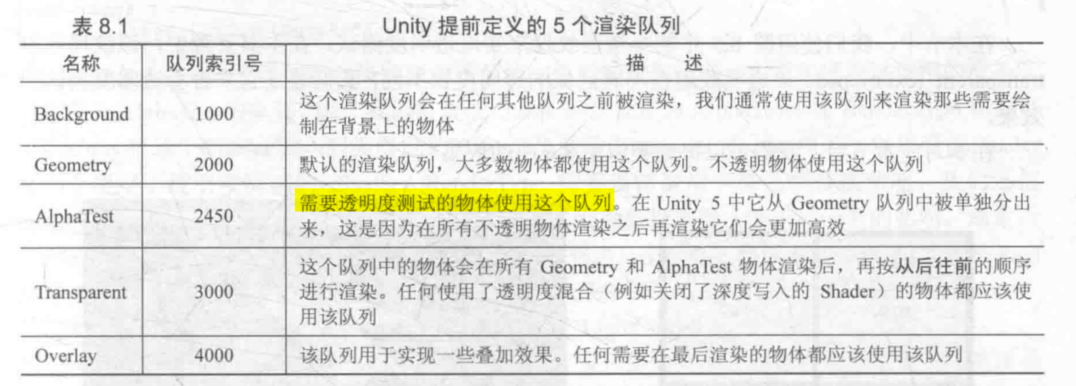
渲染队列(Render Queue)
Unity使用渲染队列来解决渲染顺序的问题,可以使用SubShader的Queue标签来决定将模型归到哪个渲染队列

透明度测试
只要一个片元的透明度不满足条件(通常是小于某个阈值),那么它对应的片元就会被舍弃
缺点:得到的透明效果要么完全透明,要么完全不透明,而且在边缘处往往参差不齐,有锯齿产生
实现代码:
1
2
3
4
5
6
7
8
9
10
11
12
13
14
15
16
17
18
19
20
21
22
23
24
25
26
27
28
29
30
31
32
33
34
35
36
37
38
39
40
41
42
43
44
45
46
47
48
49
50
51
52
53
54
55
56
57
58
59
60
61
62
63
64
65
66
67
68
69
70
71
72
73
74
75
76
77
78
79
80
81
82
| Shader "Alpha Test" {
Properties {
_Color ("Main Tint", Color) = (1, 1, 1, 1)
_MainTex("Main Tex", 2D) = "white" {}
_Cutoff("Alpha Cutoff", Range(0, 1)) = 0.5
}
SubShader {
Tags {
"Queue" = "AlphaTest"
"IgnoreProjector" = "True"
"RenderType" = "TransparentCutout"
}
Pass {
Tags {"LightMode" = "ForwardBase"}
CGPROGRAM
#include "Lighting.cginc"
#pragma vertex vert
#pragma fragment frag
fixed4 _Color;
sampler2D _MainTex;
float4 _MainTex_ST;
fixed _Cutoff;
struct a2v {
float4 vertex : POSITION;
float3 normal : NORMAL;
float4 texcoord : TEXCOORD0;
};
struct v2f {
float4 pos : SV_POSITION;
float3 worldNormal : TEXCOORD0;
float3 worldPos : TEXCOORD1;
float2 uv : TEXCOORD2;
};
v2f vert(a2v v) {
v2f o;
o.pos = UnityObjectToClipPos(v.vertex);
o.worldNormal = UnityObjectToWorldNormal(v.normal);
o.worldPos = mul(unity_ObjectToWorld, v.vertex).xyz;
o.uv = TRANSFORM_TEX(v.texcoord, _MainTex);
return o;
}
fixed4 frag(v2f i) : SV_Target {
fixed3 worldNormal = normalize(i.worldNormal);
fixed3 worldLightDir = normalize(UnityWorldSpaceLightDir(i.worldPos));
fixed4 texColor = tex2D(_MainTex, i.uv);
clip (texColor.a - _Cutoff);
fixed3 albedo = texColor.rgb * _Color.rgb;
fixed3 ambient = UNITY_LIGHTMODEL_AMBIENT.xyz * albedo;
fixed3 diffuse = _LightColor0.rgb * albedo * max(0, dot(worldNormal, worldLightDir));
return fixed4(ambient + diffuse, 1.0);
}
ENDCG
}
}
Fallback "Transparent/Cutout/VertexLit"
}
|
透明度混合
能够得到真正的半透明效果,它会使用当前片元的透明度作为混合因子,与已经存在颜色缓冲中的颜色值进行混合,得到新的颜色。但是,透明度混合需要关闭深度写入(但没有关闭深度测试,依然能够舍弃较远片元),这将由我们自己决定渲染顺序。对于透明度混合来说,深度缓冲是只读的。
注意,对于不透明物体而言,深度测试和深度检验依然是开启的,该物体依然能够写入颜色缓冲和深度缓冲
对于半透明物体和不透明物体而言,应该先渲染不透明物体,再渲染半透明物体
常用的渲染方法是:
- 先渲染所有不透明物体,并开启深度测试和深度写入
- 把半透明物体按照距离摄像机的远近进行排序,然后按照从后往前的顺序渲染这些半透明物体,并开启深度测试,关闭深度写入。这样深度缓冲中的值都是不透明物体的深度,当透明物体测试深度大于该值,则直接舍弃,否则进行透明混合
该方法的问题在于,如果物体之间在深度上存在重合像素,则难以确定正确的渲染顺序。比较好的解决方案是:
- 尽可能让模型是凸面体
- 考虑将复杂的模型拆分成可以独立排序的多个子模型,然后分别对其进行渲染
- 使用开启了深度写入的半透明效果来近似模拟物体半透明
注:对于单个物体而言,由于可以设置多个Pass来分别进行深度处理和颜色处理,因此大多数情况下依然可以方便地获得正确地渲染顺序,但是会增加性能消耗。以上问题对于多物体而言相对更加难以处理。
混合命令
Unity提供了混合命令Blend来进行混合,该命令在设置混合因子的同时也开启了混合模式,此时片元的透明通道才有意义

对于只有两个参数的命令,将使用同样的混合因子来混合RGB通道和A通道(是的,A通道也能够进行混合),该命令相当于实现以下混合公式:
$$
O_{rgb} = SrcFactor \times S_{rgb} + DstFactor \times D_{rgb}
$$
$$
O_a = SrcFactorA \times S_a + DstFactorA \times D_a
$$
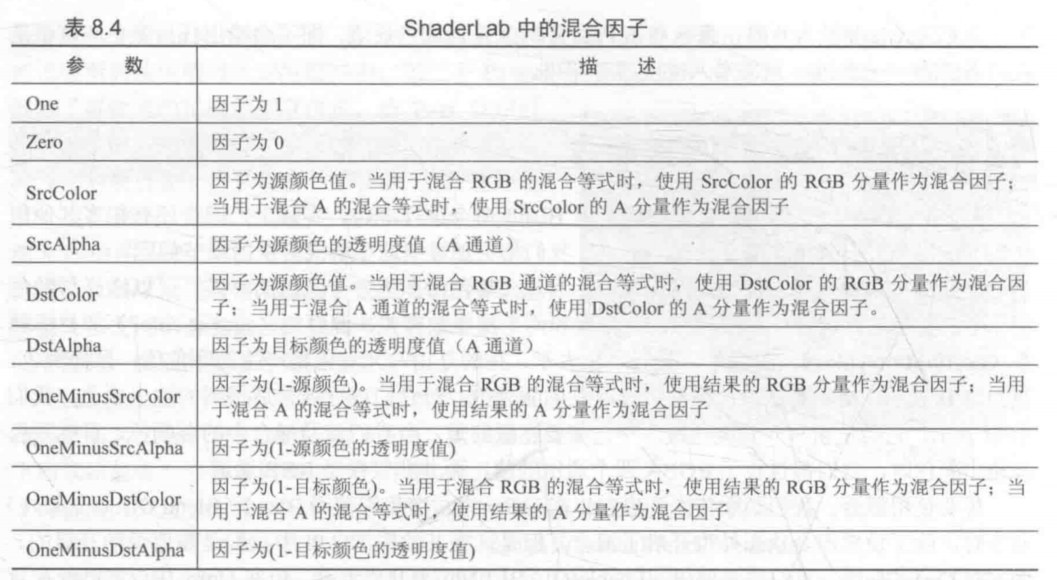
ShaderLab支持的混合因子:

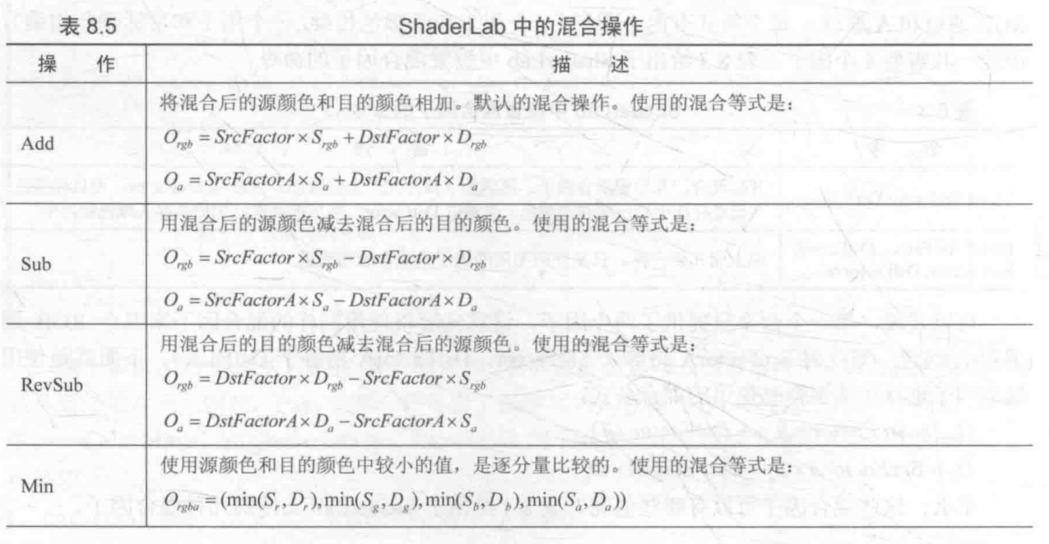
混合操作
使用BlendOp BlendOperation命令来执行混合操作


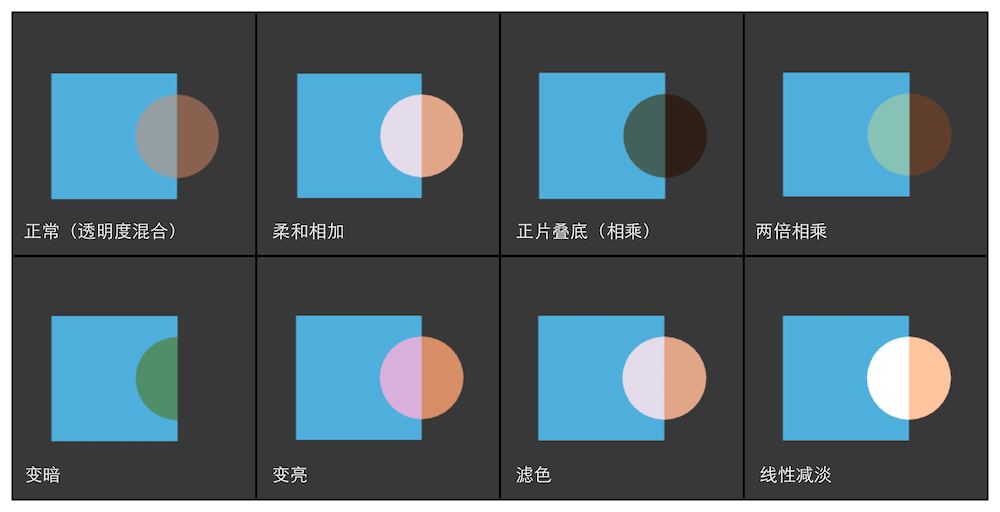
常见混合类型
1
2
3
4
5
6
7
8
9
10
11
12
13
14
15
16
17
18
19
20
21
22
23
24
25
26
27
|
Blend SrcAlpha OneMinusSrcAlpha
Blend OneMinusDstColor One
Blend DstColor Zero
Blend DstColor SrcColor
BlendOp Min
Blend One One
BlendOp Max
Blend One One
Blend OneMinusDstColor One
Blend One One
|

单一半透明效果
一种半透明Shader的实现代码如下,该Shader的问题在于,当模型本身包含复杂遮挡关系时,可能因为排序错误而产生错误的透明效果
1
2
3
4
5
6
7
8
9
10
11
12
13
14
15
16
17
18
19
20
21
22
23
24
25
26
27
28
29
30
31
32
33
34
35
36
37
38
39
40
41
42
43
44
45
46
47
48
49
50
51
52
53
54
55
56
57
58
59
60
61
62
63
64
65
66
67
68
69
70
71
72
73
74
75
76
77
78
79
80
81
82
83
84
85
86
87
| Shader "AABB/Alpha Blend" {
Properties {
_Color ("Main Tint", Color) = (1, 1, 1, 1)
_MainTex("Main Tex", 2D) = "white" {}
_AlphaScale("Alpha Scale", Range(0, 1)) = 1
}
SubShader {
Tags {
"Queue" = "Transparent"
"IgnoreProjector" = "True"
"RenderType" = "Transparent"
}
Pass {
Tags {"LightMode" = "ForwardBase"}
ZWrite Off
Blend SrcAlpha OneMinusSrcAlpha
CGPROGRAM
#include "Lighting.cginc"
#pragma vertex vert
#pragma fragment frag
fixed4 _Color;
sampler2D _MainTex;
float4 _MainTex_ST;
fixed _AlphaScale;
struct a2v {
float4 vertex : POSITION;
float3 normal : NORMAL;
float4 texcoord : TEXCOORD0;
};
struct v2f {
float4 pos : SV_POSITION;
float3 worldNormal : TEXCOORD0;
float3 worldPos : TEXCOORD1;
float2 uv : TEXCOORD2;
};
v2f vert(a2v v) {
v2f o;
o.pos = UnityObjectToClipPos(v.vertex);
o.worldNormal = UnityObjectToWorldNormal(v.normal);
o.worldPos = mul(unity_ObjectToWorld, v.vertex).xyz;
o.uv = TRANSFORM_TEX(v.texcoord, _MainTex);
return o;
}
fixed4 frag(v2f i) : SV_Target {
fixed3 worldNormal = normalize(i.worldNormal);
fixed3 worldLightDir = normalize(UnityWorldSpaceLightDir(i.worldPos));
fixed4 texColor = tex2D(_MainTex, i.uv);
fixed3 albedo = texColor.rgb * _Color.rgb;
fixed3 ambient = UNITY_LIGHTMODEL_AMBIENT.xyz * albedo;
fixed3 diffuse = _LightColor0.rgb * albedo * max(0, dot(worldNormal, worldLightDir));
return fixed4(ambient + diffuse, texColor.a * _AlphaScale);
}
ENDCG
}
}
Fallback "Transparent/VertexLit"
}
|
开启深度写入的半透明效果
对于单个物体而言,如果不想显示背面的透明效果,并且解决上述Shader产生的错误排序情况,可以使用两个Pass来渲染模型
- 第一个Pass开启深度写入,但是不输出颜色,只是把模型的深度值写入深度缓冲中
- 第二个Pass进行正常的透明度混合,能够按照像素级别的深度排序结果进行透明渲染
开启深度写入地半透明效果实现如下:
1
2
3
4
5
6
7
8
9
10
11
12
13
14
15
16
17
18
19
20
21
22
23
24
25
26
27
28
29
30
31
32
33
34
35
36
37
38
39
40
41
42
43
44
45
46
47
48
49
50
51
52
53
54
55
56
57
58
59
60
61
62
63
64
65
66
67
68
69
70
71
72
73
74
75
76
77
78
79
80
81
82
83
84
85
86
87
| Shader "Alpha Blending ZWrite" {
Properties {
_Color ("Main Tint", Color) = (1, 1, 1, 1)
_MainTex("Main Tex", 2D) = "white" {}
_AlphaScale("Alpha Scale", Range(0, 1)) = 1
}
SubShader {
Tags {
"Queue" = "Transparent"
"IgnoreProjector" = "True"
"RenderType" = "Transparent"
}
Pass {
ZWrite On
ColorMask 0
}
Pass {
Tags {"LightMode" = "ForwardBase"}
ZWrite Off
Blend SrcAlpha OneMinusSrcAlpha
CGPROGRAM
#include "Lighting.cginc"
#pragma vertex vert
#pragma fragment frag
fixed4 _Color;
sampler2D _MainTex;
float4 _MainTex_ST;
fixed _AlphaScale;
struct a2v {
float4 vertex : POSITION;
float3 normal : NORMAL;
float4 texcoord : TEXCOORD0;
};
struct v2f {
float4 pos : SV_POSITION;
float3 worldNormal : TEXCOORD0;
float3 worldPos : TEXCOORD1;
float2 uv : TEXCOORD2;
};
v2f vert(a2v v) {
v2f o;
o.pos = UnityObjectToClipPos(v.vertex);
o.worldNormal = UnityObjectToWorldNormal(v.normal);
o.worldPos = mul(unity_ObjectToWorld, v.vertex).xyz;
o.uv = TRANSFORM_TEX(v.texcoord, _MainTex);
return o;
}
fixed4 frag(v2f i) : SV_Target {
fixed3 worldNormal = normalize(i.worldNormal);
fixed3 worldLightDir = normalize(UnityWorldSpaceLightDir(i.worldPos));
fixed4 texColor = tex2D(_MainTex, i.uv);
fixed3 albedo = texColor.rgb * _Color.rgb;
fixed3 ambient = UNITY_LIGHTMODEL_AMBIENT.xyz * albedo;
fixed3 diffuse = _LightColor0.rgb * albedo * max(0, dot(worldNormal, worldLightDir));
return fixed4(ambient + diffuse, texColor.a * _AlphaScale);
}
ENDCG
}
}
Fallback "Diffuse"
}
|
双面渲染的透明效果
默认情况下,渲染引擎会剔除物体背面(相对于摄像机方向)的图元,可以使用Cull指令来控制需要剔除哪些面的图元
1
| Cull Back(默认) | Front(剔除正面) | Off(双面渲染)
|
透明度测试的双面渲染
实现代码如下:
1
2
3
4
5
6
7
8
9
10
11
12
13
14
15
16
17
18
19
20
21
22
23
24
25
26
27
28
29
30
31
32
33
34
35
36
37
38
39
40
41
42
43
44
45
46
47
48
49
50
51
52
53
54
55
56
57
58
59
60
61
62
63
64
65
66
67
68
69
70
71
72
73
74
75
76
77
78
79
80
81
82
| Shader "Alpha Test Both Sided" {
Properties {
_Color ("Main Tint", Color) = (1, 1, 1, 1)
_MainTex("Main Tex", 2D) = "white" {}
_Cutoff("Alpha Cutoff", Range(0, 1)) = 0.5
}
SubShader {
Tags {
"Queue" = "AlphaTest"
"IgnoreProjector" = "True"
"RenderType" = "TransparentCutout"
}
Pass {
Tags {"LightMode" = "ForwardBase"}
Cull Off
CGPROGRAM
#include "Lighting.cginc"
#pragma vertex vert
#pragma fragment frag
fixed4 _Color;
sampler2D _MainTex;
float4 _MainTex_ST;
fixed _Cutoff;
struct a2v {
float4 vertex : POSITION;
float3 normal : NORMAL;
float4 texcoord : TEXCOORD0;
};
struct v2f {
float4 pos : SV_POSITION;
float3 worldNormal : TEXCOORD0;
float3 worldPos : TEXCOORD1;
float2 uv : TEXCOORD2;
};
v2f vert(a2v v) {
v2f o;
o.pos = UnityObjectToClipPos(v.vertex);
o.worldNormal = UnityObjectToWorldNormal(v.normal);
o.worldPos = mul(unity_ObjectToWorld, v.vertex).xyz;
o.uv = TRANSFORM_TEX(v.texcoord, _MainTex);
return o;
}
fixed4 frag(v2f i) : SV_Target {
fixed3 worldNormal = normalize(i.worldNormal);
fixed3 worldLightDir = normalize(UnityWorldSpaceLightDir(i.worldPos));
fixed4 texColor = tex2D(_MainTex, i.uv);
clip (texColor.a - _Cutoff);
fixed3 albedo = texColor.rgb * _Color.rgb;
fixed3 ambient = UNITY_LIGHTMODEL_AMBIENT.xyz * albedo;
fixed3 diffuse = _LightColor0.rgb * albedo * max(0, dot(worldNormal, worldLightDir));
return fixed4(ambient + diffuse, 1.0);
}
ENDCG
}
}
Fallback "Transparent/Cutout/VertexLit"
}
|
透明度混合的双面渲染
方法:使用两个Pass,前一个渲染背面,后一个渲染正面
1
2
3
4
5
6
7
8
9
10
11
12
13
14
15
16
17
18
19
20
21
22
23
24
25
26
27
28
29
30
31
32
33
34
35
36
37
38
39
40
41
42
43
44
45
46
47
48
49
50
51
52
53
54
55
56
57
58
59
60
61
62
63
64
65
66
67
68
69
70
71
72
73
74
75
76
77
78
79
80
81
82
83
84
85
86
87
88
89
90
91
92
93
94
95
96
97
98
99
100
101
102
103
104
105
106
107
108
109
110
111
112
113
114
115
116
117
118
119
120
121
122
123
124
125
126
127
128
129
130
131
132
133
134
135
136
137
138
139
140
141
142
143
144
145
146
147
148
149
150
151
| Shader "AABB/Alpha Blend Both Sided" {
Properties {
_Color ("Main Tint", Color) = (1, 1, 1, 1)
_MainTex("Main Tex", 2D) = "white" {}
_AlphaScale("Alpha Scale", Range(0, 1)) = 1
}
SubShader {
Tags {
"Queue" = "Transparent"
"IgnoreProjector" = "True"
"RenderType" = "Transparent"
}
Pass {
Tags {"LightMode" = "ForwardBase"}
Cull Front
ZWrite Off
Blend SrcAlpha OneMinusSrcAlpha
CGPROGRAM
#include "Lighting.cginc"
#pragma vertex vert
#pragma fragment frag
fixed4 _Color;
sampler2D _MainTex;
float4 _MainTex_ST;
fixed _AlphaScale;
struct a2v {
float4 vertex : POSITION;
float3 normal : NORMAL;
float4 texcoord : TEXCOORD0;
};
struct v2f {
float4 pos : SV_POSITION;
float3 worldNormal : TEXCOORD0;
float3 worldPos : TEXCOORD1;
float2 uv : TEXCOORD2;
};
v2f vert(a2v v) {
v2f o;
o.pos = UnityObjectToClipPos(v.vertex);
o.worldNormal = UnityObjectToWorldNormal(v.normal);
o.worldPos = mul(unity_ObjectToWorld, v.vertex).xyz;
o.uv = TRANSFORM_TEX(v.texcoord, _MainTex);
return o;
}
fixed4 frag(v2f i) : SV_Target {
fixed3 worldNormal = normalize(i.worldNormal);
fixed3 worldLightDir = normalize(UnityWorldSpaceLightDir(i.worldPos));
fixed4 texColor = tex2D(_MainTex, i.uv);
fixed3 albedo = texColor.rgb * _Color.rgb;
fixed3 ambient = UNITY_LIGHTMODEL_AMBIENT.xyz * albedo;
fixed3 diffuse = _LightColor0.rgb * albedo * max(0, dot(worldNormal, worldLightDir));
return fixed4(ambient + diffuse, texColor.a * _AlphaScale);
}
ENDCG
}
Pass {
Tags {"LightMode" = "ForwardBase"}
Cull Back
ZWrite Off
Blend SrcAlpha OneMinusSrcAlpha
CGPROGRAM
#include "Lighting.cginc"
#pragma vertex vert
#pragma fragment frag
fixed4 _Color;
sampler2D _MainTex;
float4 _MainTex_ST;
fixed _AlphaScale;
struct a2v {
float4 vertex : POSITION;
float3 normal : NORMAL;
float4 texcoord : TEXCOORD0;
};
struct v2f {
float4 pos : SV_POSITION;
float3 worldNormal : TEXCOORD0;
float3 worldPos : TEXCOORD1;
float2 uv : TEXCOORD2;
};
v2f vert(a2v v) {
v2f o;
o.pos = UnityObjectToClipPos(v.vertex);
o.worldNormal = UnityObjectToWorldNormal(v.normal);
o.worldPos = mul(unity_ObjectToWorld, v.vertex).xyz;
o.uv = TRANSFORM_TEX(v.texcoord, _MainTex);
return o;
}
fixed4 frag(v2f i) : SV_Target {
fixed3 worldNormal = normalize(i.worldNormal);
fixed3 worldLightDir = normalize(UnityWorldSpaceLightDir(i.worldPos));
fixed4 texColor = tex2D(_MainTex, i.uv);
fixed3 albedo = texColor.rgb * _Color.rgb;
fixed3 ambient = UNITY_LIGHTMODEL_AMBIENT.xyz * albedo;
fixed3 diffuse = _LightColor0.rgb * albedo * max(0, dot(worldNormal, worldLightDir));
return fixed4(ambient + diffuse, texColor.a * _AlphaScale);
}
ENDCG
}
}
Fallback "Transparent/VertexLit"
}
|


