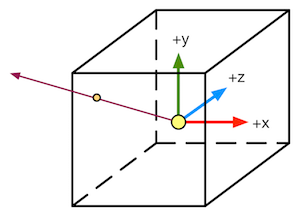
高级纹理 立方体纹理 立方体纹理(Cubemap) 是环境映射 的一种实现形式,可以用于模拟物体周围的环境,或者模拟金属反射周围的环境
原理:
立方体纹理包含6个图像,在进行纹理采样时,计算从立方体中心出发的矢量和立方体的交点,然后对该交点进行像素采样
优点:
实现快速,效果良好
缺点:
当场景中引入新的物体、光源,或者物体本身需要移动时,立方体纹理也需要重新生成
不能反射使用了该立方体纹理的物体本身,难以处理金属的多次反射
天空盒子(Skybox) 用于模拟背景或者天空,整个场景被包围在一个立方体内
实现:
新建材质,在UnityShader下拉菜单中选择Skybox/6 Sided
使用6张纹理对材质进行赋值
设置纹理WrapMode为Clamp,防止出现接缝处不匹配现象
调整属性:
Tint Color:控制该材质的整体颜色
Exposure:调整天空盒子的亮度
Rotation:调整天空盒子沿+y轴方向的旋转角度
在Window-》Rendering-》Lighting中,将该材质赋值给Skybox选项
也可以给摄像机设置单独的天空盒子来覆盖默认的,只需要添加Skybox组件即可
创建用于环境映射的立方体纹理
直接由特殊布局的纹理创建。该纹理类似于立方体展开图的交叉布局、全景布局等。该方法可以对纹理数据进行压缩,也支持边缘修正、光滑反射等
手动创建Cubemap资源,再把6张图赋值给它
由脚本生成
使用方法1创建立方体纹理:
指定环境映射的位置
使用Camera.RenderToCubemap函数创建立方体纹理,相关代码如下,需要放置在Editor文件夹下
1
2
3
4
5
6
7
8
9
10
11
12
13
14
15
16
17
18
19
20
21
22
23
24
25
26
27
28
29
30
31
32
33
using UnityEngine;using UnityEditor;using System.Collections;public class RenderCubemapWizard : ScriptableWizard {public Transform renderFromPosition;public Cubemap cubemap;void OnWizardUpdate ()"Select transform to render from and cubemap to render into" ;null ) && (cubemap != null );void OnWizardCreate ()new GameObject( "CubemapCamera" );MenuItem("GameObject/Render into Cubemap" ) ]static void RenderCubemap ()"Render cubemap" , "Render!" );
选择Create-》Legacy-》Cubemap创建立方体纹理,在面板中勾选Readable选项
使用Wizard(刚刚编写的向导脚本)对立方体纹理添加具体图像
调整Face Size选项,值越大分辨率越大,但是占用内存也越多
反射 原理:通过入射光线的方向和表面法线的方向计算反射方向,再利用反射方向对立方体进行纹理采样
实现代码如下:
1
2
3
4
5
6
7
8
9
10
11
12
13
14
15
16
17
18
19
20
21
22
23
24
25
26
27
28
29
30
31
32
33
34
35
36
37
38
39
40
41
42
43
44
45
46
47
48
49
50
51
52
53
54
55
56
57
58
59
60
61
62
63
64
65
66
67
68
69
70
71
72
73
74
75
76
77
78
79
80
81
82
83
84
85
86
87
88
89
Shader "Reflection" {1 , 1 , 1 , 1 )1 , 1 , 1 , 1 )0 , 1 )) = 1 #pragma multi_compile_fwdbase #pragma vertex vert #pragma fragment frag #include "Lighting.cginc" #include "AutoLight.cginc" 4 )reflect (-o.worldViewDir, o.worldNormal);return o;normalize (i.worldNormal);normalize (UnityWorldSpaceLightDir(i.worldPos)); normalize (i.worldViewDir); max (0 , dot (worldNormal, worldLightDir));return fixed4(color, 1.0 );
折射 原理:当光线从一种介质斜射入另一种介质时,传播方向一般会发生改变
使用**斯涅尔定律(Snell’s Law)**来计算反射角:
实现代码如下:
1
2
3
4
5
6
7
8
9
10
11
12
13
14
15
16
17
18
19
20
21
22
23
24
25
26
27
28
29
30
31
32
33
34
35
36
37
38
39
40
41
42
43
44
45
46
47
48
49
50
51
52
53
54
55
56
57
58
59
60
61
62
63
64
65
66
67
68
69
70
71
72
73
74
75
76
77
78
79
80
81
82
83
84
85
86
87
88
89
90
91
Shader "Refraction" {1 , 1 , 1 , 1 )1 , 1 , 1 , 1 )0 , 1 )) = 1 0.1 , 1 )) = 0.5 #pragma multi_compile_fwdbase #pragma vertex vert #pragma fragment frag #include "Lighting.cginc" #include "AutoLight.cginc" float _RefractAmount;4 )refract (-normalize (o.worldViewDir), normalize (o.worldNormal), _RefractRatio);return o;normalize (i.worldNormal);normalize (UnityWorldSpaceLightDir(i.worldPos));normalize (i.worldViewDir);max (0 , dot (worldNormal, worldLightDir));return fixed4(color, 1.0 );
菲涅耳反射(Fresnel reflection) 原理:
当光线照射到物体表面时,一部分发生反射,一部分进入物体内部,发生折射或者散射。被反射的光和入射光之间存在一定的比率关系,该比率可以通过菲涅耳等式计算。
Schlick菲涅耳近似等式:
Empricial菲涅耳近似等式:
实现代码如下:
1
2
3
4
5
6
7
8
9
10
11
12
13
14
15
16
17
18
19
20
21
22
23
24
25
26
27
28
29
30
31
32
33
34
35
36
37
38
39
40
41
42
43
44
45
46
47
48
49
50
51
52
53
54
55
56
57
58
59
60
61
62
63
64
65
66
67
68
69
70
71
72
73
74
75
76
77
78
79
80
81
82
83
Shader "Fresnel" {1 , 1 , 1 , 1 )0 , 1 )) = 0.5 #pragma multi_compile_fwdbase #pragma vertex vert #pragma fragment frag #include "Lighting.cginc" #include "AutoLight.cginc" 4 )reflect (-o.worldViewDir, o.worldNormal);return o;normalize (i.worldNormal);normalize (UnityWorldSpaceLightDir(i.worldPos));normalize (i.worldViewDir);1 - _FresnelScale) * pow (1 - dot (worldViewDir, worldNormal), 5 );max (0 , dot (worldNormal, worldLightDir));return fixed4(color, 1.0 );
渲染纹理 渲染目标纹理(RTT) :现代GPU允许把整个三维场景渲染到一个中间缓冲中
多重渲染目标(MRT) :GPU允许把场景同时渲染到多个渲染目标纹理中,不再需要为每个渲染目标纹理单独渲染完整的场景
渲染纹理(Render Texture):Unity为渲染目标定义了一种专门的纹理类型,通常有两种方式:
在Project目录下创建一个渲染纹理,然后把某个摄像机的渲染目标设置成该渲染纹理,这样摄像机的渲染结果就会实时更新到渲染纹理中,而不会显示在屏幕上。还可以选择渲染纹理分辨率、滤波模式等属性
在屏幕后处理使用时使用Grab Pass命令或者OnRenderImage函数获取当前屏幕图像,Unity将图像放到一张和屏幕分辨率等同的渲染纹理中
镜子效果 实现原理:使用一个渲染纹理作为输入属性,并把该渲染纹理在水平方向上翻转后直接显示到物体上
在Project视图中创建渲染纹理(Create-》Render Texture)
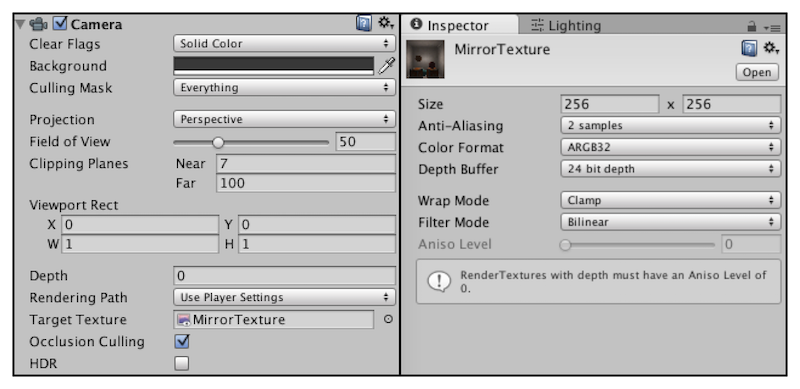
为了得到从镜子出发观察到的图像,需要创建一个摄像机,并调整它的位置、裁剪平面、视角等,使得它显示的图像是我们希望的图像。再将渲染纹理(Mirror Texture)附加到该摄像机上
渲染纹理的分辨率可能影响到画面效果,此时可以调整为更高的分辨率或者进行抗锯齿采样,但同时也会损失性能
相关代码如下:
1
2
3
4
5
6
7
8
9
10
11
12
13
14
15
16
17
18
19
20
21
22
23
24
25
26
27
28
29
30
31
32
33
34
35
36
37
38
39
40
41
42
43
44
45
46
47
Shader "Mirror" {2 D) = "white" {}#pragma vertex vert #pragma fragment frag sampler2D _MainTex;1 - o.uv.x;return o;return tex2D(_MainTex, i.uv);
玻璃效果 原理:
使用法线纹理来修改模型的法线信息
通过Cubemap模拟玻璃的反射
使用GrabPass抓取玻璃后的屏幕图像后,使用切线空间下的法线对屏幕纹理坐标偏移以模拟近似的折射 效果
相关代码如下:
1
2
3
4
5
6
7
8
9
10
11
12
13
14
15
16
17
18
19
20
21
22
23
24
25
26
27
28
29
30
31
32
33
34
35
36
37
38
39
40
41
42
43
44
45
46
47
48
49
50
51
52
53
54
55
56
57
58
59
60
61
62
63
64
65
66
67
68
69
70
71
72
73
74
75
76
77
78
79
80
81
82
83
84
85
86
87
88
89
90
91
92
93
94
95
96
97
98
99
100
101
102
103
104
105
106
107
108
109
110
111
112
113
114
115
116
117
118
119
120
121
Shader "Glass Refraction" {2 D) = "white" {}2 D) = "bump" {}0 , 100 )) = 10 0.0 , 1.0 )) = 1.0 #pragma vertex vert #pragma fragment frag #include "UnityCG.cginc" sampler2D _MainTex;sampler2D _BumpMap;float _Distortion;sampler2D _RefractionTex;cross (worldNormal, worldTangent) * v.tangent.w; return o;normalize (UnityWorldSpaceViewDir(worldPos));offset = bump.xy * _Distortion * _RefractionTex_TexelSize.xy;offset * i.scrPos.z + i.scrPos.xy;normalize (half3(dot (i.TtoW0.xyz, bump), dot (i.TtoW1.xyz, bump), dot (i.TtoW2.xyz, bump)));reflect (-worldViewDir, bump);1 - _RefractAmount) + refrCol * _RefractAmount;return fixed4(finalColor, 1 );
渲染纹理和GrabPass的比较 GrabPass:
在Shader中编写相关指令,使用简单
效率上次于渲染纹理,特别是在移动设备上
渲染纹理:
首先需要创建一个渲染纹理和摄像机,然后摄像机计算得到渲染纹理后将纹理交给shader
可以自定义渲染纹理大小
可以通过调整摄像机的渲染层来减少二次渲染的场景大小
可以控制摄像机是否需要开启
移动设备优先使用该方法
Unity的命令缓冲也能够得到类似于抓屏的效果,Unity - Manual: Extending the Built-in Render Pipeline with CommandBuffers (unity3d.com)
程序纹理 使用特定的算法来创建图案,可以更加自由地控制纹理外观和形状
使用代码生成波点纹理 生成脚本:
1
2
3
4
5
6
7
8
9
10
11
12
13
14
15
16
17
18
19
20
21
22
23
24
25
26
27
28
29
30
31
32
33
34
35
36
37
38
39
40
41
42
43
44
45
46
47
48
49
50
51
52
53
54
55
56
57
58
59
60
61
62
63
64
65
66
67
68
69
70
71
72
73
74
75
76
77
78
79
80
81
82
83
84
85
86
87
88
89
90
91
92
93
94
95
96
97
98
99
100
101
102
103
104
105
106
107
108
109
110
111
112
113
114
115
116
117
118
119
120
121
122
123
124
125
126
127
128
129
130
131
132
133
134
using UnityEngine;using System.Collections;using System.Collections.Generic;ExecuteInEditMode ]public class ProceduralTextureGeneration : MonoBehaviour {public Material material = null ;#region Material properties SerializeField, SetProperty("textureWidth" ) ]private int m_textureWidth = 512 ;public int textureWidth {get {return m_textureWidth;set {value ;SerializeField, SetProperty("backgroundColor" ) ]private Color m_backgroundColor = Color.white;public Color backgroundColor {get {return m_backgroundColor;set {value ;SerializeField, SetProperty("circleColor" ) ]private Color m_circleColor = Color.yellow;public Color circleColor {get {return m_circleColor;set {value ;SerializeField, SetProperty("blurFactor" ) ]private float m_blurFactor = 2.0f ;public float blurFactor {get {return m_blurFactor;set {value ;#endregion private Texture2D m_generatedTexture = null ;void Start ()if (material == null ) {if (renderer == null ) {"Cannot find a renderer." );return ;private void _UpdateMaterial() {if (material != null ) {"_MainTex" , m_generatedTexture);private Color _MixColor(Color color0, Color color1, float mixFactor) {return mixColor;private Texture2D _GenerateProceduralTexture() {new Texture2D(textureWidth, textureWidth);float circleInterval = textureWidth / 4.0f ;float radius = textureWidth / 10.0f ;float edgeBlur = 1.0f / blurFactor;for (int w = 0 ; w < textureWidth; w++) {for (int h = 0 ; h < textureWidth; h++) {for (int i = 0 ; i < 3 ; i++) {for (int j = 0 ; j < 3 ; j++) {new Vector2(circleInterval * (i + 1 ), circleInterval * (j + 1 ));float dist = Vector2.Distance(new Vector2(w, h), circleCenter) - radius;new Color(pixel.r, pixel.g, pixel.b, 0.0f ), Mathf.SmoothStep(0f , 1.0f , dist * edgeBlur));return proceduralTexture;
Unity的程序材质 使用Substance Designer 来生成纹理,使用该程序纹理得到程序材质 (Procedural Materials)
可以导入外部的程序纹理后,在Unity中调节出不同效果

